If you want healthy cannabis plants, measuring cannabis soil pH has to be part of your routine. Soil pH tells you how acidic or alkaline the root environment is, and that directly affects how well your plants can absorb nutrients. Even when you feed correctly, the wrong pH can stop roots from taking in what they need.
That is where nutrient lockout becomes a serious problem. Nutrient lockout happens when essential elements are present in the soil, but the plant cannot use them because the pH is out of range. Leaves may yellow, tips may burn, growth may slow, and growers often mistake the issue for underfeeding or overfeeding. In reality, the problem is often the root zone pH.
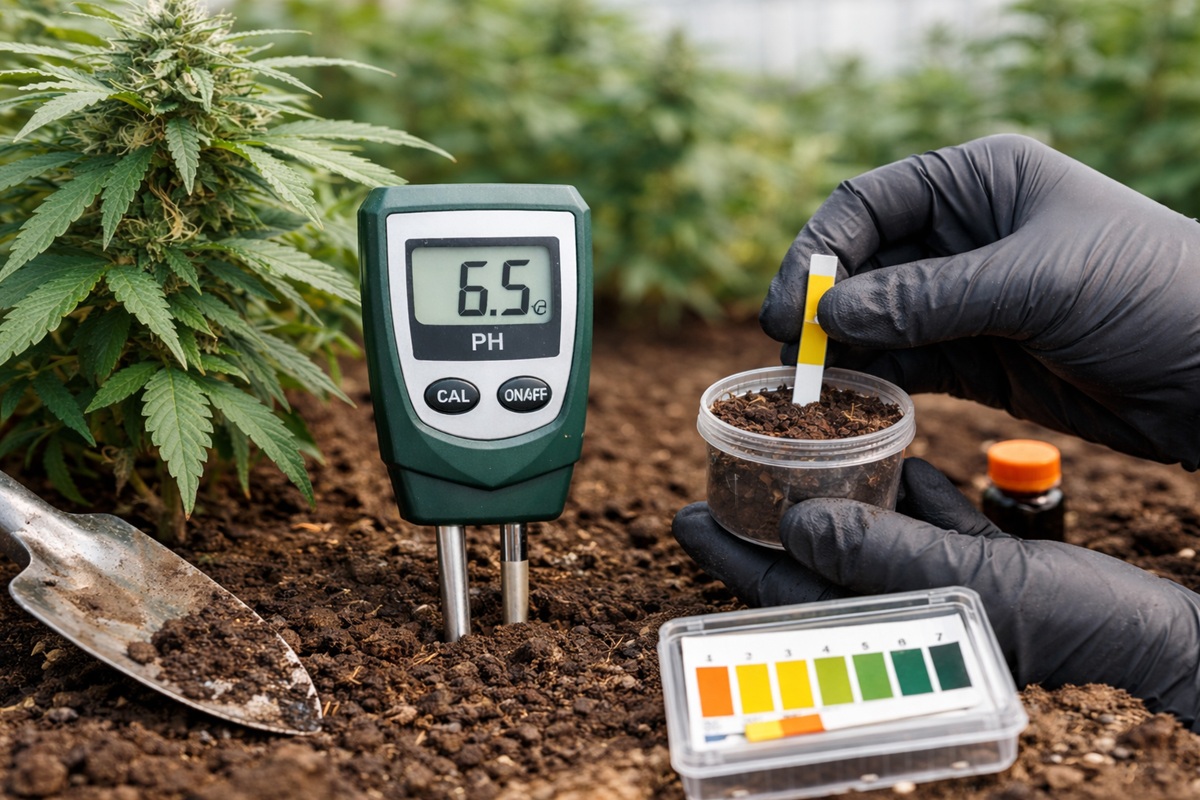
The good news is that soil pH is easy to monitor once you know the right methods. For cannabis grown in soil, the target is pH range 6.0–7.0. For soilless mixes, the ideal range is pH range 5.8–6.5. The most reliable ways to check it are the runoff test, the soil slurry test, and a digital soil pH meter.
Why Soil pH Matters for Cannabis Health
Cannabis roots do not absorb every nutrient equally at every pH level. Some nutrients become easier to take up at lower pH, while others are more available in a slightly higher range. When the pH drifts too far in either direction, the plant starts losing access to part of its food supply.
This has a direct impact on plant health. Poor nutrient availability can lead to weak stems, pale leaves, slow vigor, reduced flowering performance, and lower yields. Calcium, magnesium, phosphorus, and micronutrients are especially sensitive to pH imbalance. A plant can look deficient even when the soil still contains enough nutrients.
That is why pH management is not a minor detail. It is one of the main foundations of stable cannabis cultivation. If your pH is correct, feeding becomes more efficient and the plant can maintain steady growth without unnecessary stress.
Ideal pH Range for Soil and Soilless Mixes
The target range depends on the medium you use.
|
Growing medium
|
Recommended pH
|
|
Soil
|
6.0-7.0
|
|
Soilless mixes
|
5.8-6.5
|
Traditional soil has more buffering capacity, so it tolerates a slightly wider range. Soilless media such as coco-based blends usually perform better in a slightly lower, tighter window. Because of that, growers should not assume one universal target applies to every setup.
If you are growing in soil, staying around the middle of the range is often the safest approach. If you are using soilless media, regular monitoring matters even more because pH can shift faster.
Signs and Risks of Nutrient Lockout
When pH drifts out of range, cannabis plants often show symptoms that mimic nutrient deficiencies. Common warning signs include:
- yellowing leaves
- rust spots or necrotic patches
- burnt leaf tips
- weak new growth
- drooping despite proper watering
- stalled growth and lower vigor
In soil, readings below 5.5 or above 7.0 usually signal that correction is needed. At that point, the roots are no longer operating in an ideal zone, and nutrient lockout becomes more likely. Many growers make the mistake of adding more fertilizer, which can worsen the imbalance instead of solving it.
The better first step is always to test the root environment accurately.
Main Methods for Testing Soil pH
There are three practical ways to measure cannabis soil pH:
- Runoff test
Measures the pH of water exiting the pot, which helps estimate pH around the root zone.
- Soil slurry test
Uses a mixed sample of soil and distilled water for a more direct reading of the medium itself. This is generally considered the most accurate home method.
- Digital soil pH meter
A probe is inserted directly into moist soil for a quick reading near the root zone.
Each method has strengths and limits, so many growers use more than one over time.
How to Perform the Runoff Test
The runoff test is popular because it is simple and works during normal watering.
Step-by-step runoff test
- Start with pH-balanced water at about 6.5.
- Water the container evenly until you produce roughly 20% runoff.
- Collect the runoff in a clean container.
- Test the runoff with a pH meter, strips, or test drops.
- Compare the reading to the target range for your medium.
How to interpret runoff results
- 6.0 to 7.0 in soil: generally acceptable
- Below 5.5: too acidic, correction needed
- Above 7.0: too alkaline, correction needed
Benefits and limitations
The runoff test is easy, quick, and useful for routine checks. It gives a decent estimate of what is happening around the roots. However, runoff is still an indirect reading. Salts, uneven watering, or dry pockets in the pot can influence the result. That is why runoff is useful for monitoring trends, but not always the best method for diagnosing a stubborn pH issue.
How to Perform the Soil Slurry Test
The soil slurry test is widely considered the most accurate method for small growers because it measures the medium more directly.
Step-by-step soil slurry test
- Take a sample from 2–4 inches deep near the root zone.
- Place it in a clean cup or container.
- Mix 1 part soil with 1 part distilled water.
- Stir thoroughly.
- Let the mixture sit for 20–30 minutes.
- Test the liquid with a calibrated pH probe, or filter the liquid and test it with strips.
Why it is more accurate
Unlike runoff, the slurry method tests the soil sample itself. That gives you a clearer picture of the medium’s true pH instead of the pH of water draining through it. For troubleshooting nutrient lockout or verifying a suspicious runoff reading, slurry testing is often the best choice.
Best practices
Use only clean tools and distilled water. Tap water can alter the result because dissolved minerals may shift the reading. Also, keep the sample at room temperature. Extreme hot or cold conditions can reduce measurement accuracy.
How to Use a Digital Soil pH Meter
A digital soil pH meter offers speed and convenience. Some specialized probes are designed to read directly in moist soil without preparing a separate sample.

How to use it properly
- Make sure the soil is evenly moist, not bone dry.
- Calibrate the meter first using pH 4.0 and pH 7.0 calibration solutions.
- Insert the probe near the root zone.
- Wait until the reading stabilizes.
- Repeat in a few different spots for a more reliable average.
Advantages and drawbacks
A direct meter is fast and convenient, especially for regular checks. It reduces prep time and makes weekly monitoring easier. The downside is that lower-end probes can be inconsistent, and readings may vary depending on soil moisture, probe placement, and calibration quality. For that reason, direct meters are best used with good technique and occasional confirmation from a slurry test.
Best Tools for Measuring pH
A few basic tools make pH testing far more reliable:
|
Tool
|
Best use
|
|
Apera PH20
|
General liquid pH testing for runoff and slurry samples
|
|
Bluelab Soil pH Pen
|
Direct soil testing near the root zone
|
|
Test strips or drops
|
Low-cost backup checks
|
|
Distilled water
|
Clean sample preparation
|
|
pH 4.0 and 7.0 solutions
|
Meter calibration
|
The most important tool is not necessarily the most expensive one. What matters most is using a reliable device, calibrating it correctly, and keeping your testing routine consistent.
How Often to Test Cannabis Soil pH
For most growers, weekly pH testing is a good minimum. In more sensitive setups, especially soilless media, it is smart to check pH every time plants are watered or at least during regular watering cycles.
Frequent testing helps you spot drift before it becomes a serious problem. It also lets you see patterns over time. If one watering looks unusual, a logbook can help you decide whether it was a one-off reading or the start of a trend.
Consistency matters more than perfection. A simple routine is better than only testing after plants already show damage.
How to Correct High or Low Soil pH
If your readings are outside the ideal range, correct gradually rather than making extreme changes all at once.
To raise pH
Use dolomite lime or garden lime to reduce acidity. Dolomite lime is especially useful because it can also supply calcium and magnesium while helping stabilize pH over time.
To lower pH
Use sulfur or a commercial soil acidifier to make the medium more acidic. These products work more gradually than adjusting irrigation water, which can be useful for long-term correction.
|
Problem
|
Product
|
Purpose
|
|
Soil too acidic
|
Dolomite lime
|
Raises pH
|
|
Soil too acidic
|
Garden lime
|
Raises pH
|
|
Soil too alkaline
|
Sulfur
|
Lowers pH
|
|
Soil too alkaline
|
Soil acidifier
|
Lowers pH
|
After making adjustments, retest before assuming the problem is solved. Soil amendments may take time to fully influence the medium, so patience is part of the process.
Comparison Table: Which Testing Method Is Best?
|
Method
|
Accuracy
|
Ease of use
|
Cost
|
Speed
|
Best use case
|
|
Runoff test
|
Moderate
|
Easy
|
Low
|
Fast
|
Routine monitoring during watering
|
|
Soil slurry test
|
High
|
Moderate
|
Low
|
Medium
|
Diagnosing nutrient lockout and confirming true soil pH
|
|
Digital soil pH meter
|
Moderate to high
|
Easy
|
Medium to high
|
Fast
|
Quick direct checks near the root zone
|
For many growers, the best approach is simple: use runoff for regular monitoring, use a digital meter for fast spot checks, and use a slurry test when accuracy matters most.
Common Mistakes That Affect pH Accuracy
Several common mistakes can produce misleading results:
Skipping calibration
A digital meter is only as good as its calibration. Always use fresh pH 4.0 and pH 7.0 solutions before testing.
Using contaminated containers
Dirty cups, probes, or mixing tools can shift readings.
Using tap water instead of distilled water
Tap water can contain minerals that alter the sample, especially in a slurry test.
Testing at the wrong temperature
A room temperature sample is best. Very cold or very warm water can affect the result.
Misreading runoff results
Runoff is helpful, but it is still an estimate. Do not treat one odd runoff reading as final proof without checking again.
Testing dry soil with a direct probe
A digital soil pH meter works best in moist soil. Dry pockets can distort readings.
Final Tips for Consistent Soil Management
The fastest answer to the core question is this: measure cannabis soil pH with a runoff test, soil slurry test, or digital soil pH meter, and keep the medium in the correct range to avoid nutrient lockout. Aim for 6.0 to 7.0 in soil and 5.8 to 6.5 in soilless mixes.
Routine pH monitoring protects nutrient uptake, plant health, and final yield. It also saves time by helping you solve the real issue before you start changing nutrients unnecessarily. Test often, calibrate your tools, use distilled water for clean samples, and work at room temperature whenever possible.
When growers stay consistent with pH management, the entire feeding program becomes more predictable. Healthy roots absorb nutrients more efficiently, symptoms become easier to interpret, and cannabis plants are far less likely to suffer from avoidable lockout.


 @ganjafarmer.seed
 @GanjaFarmerSeed